Thursday, September 28, 2017

A Paper Pumpkin Thing Blog Hop - Layered Leaves

Welcome to our fabulous A Paper Pumpkin Thing Blog Hop!  Every month I receive a surprise card/project kit from Stampin' Up!.  I love this fall/Thanksgiving themed kit!


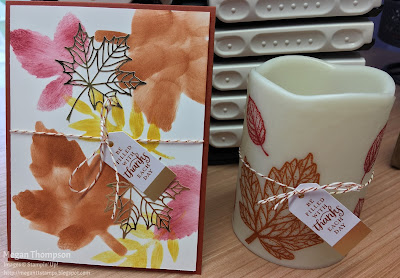
I struggled a bit for an alternate project & card because I love the projects & cards in the kit!  Once I finally got my creative mojo going here is what I came up with this month!

 
All the details for my card and my project are below.  I have put an asterisks next to items that were in addition to the Paper Pumpkin kit.


Details for the card:
  • *Cajun Craze Card base - 11" x 4 1/4" and score at 5 1/2"
  • *Whisper White 5 1/4" x 4"
  • Used the negative/outline that is left from the leaves with *Cherry Cobbler, Cajun Craze, and *Crushed Curry inks.  I used *sponge daubers for this part.  I tried sponge wedges, but it was too challenging to work with the small outlines and not get extra ink on the card front.
  • Added a couple gold leaves to the card front.
  • Used the bakers twine included with the kit to wrap around the card front before adhering to card base.
  • Stamped the sentiment in Cajun Craze on the kit included tags.

I have seen this candle and stamping idea a number of places online.  I picked up some battery operated lights from the local dollar store and decided to try this technique.


Details for the project:
  • *Battery operated light from the local dollar store
  • Using *tissue paper and stamp leaves on it in *Cherry Cobbler and Cajun Craze inks onto the tissue paper.
  • Wrap the tissue paper around the candle and very carefully heat/melt the tissue paper into the candle using your heat gun.  Be careful and I set it on some scrap paper because some of the wax leaked to the bottom of the candle.  Set aside to cool and harden.
  • Used the bakers twine included with the kit to wrap around the card front before adhering to card base.
  • Stamped the sentiment in Cajun Craze on the kit included tags.
I hope you enjoyed my card and project.  Thanks for visiting!  
Your next hop in the blog is Lori!
  
http://www.stampindreams.com/my-blog/2017/09/a-paper-pumpkin-thing-blog-hop-layered-leaves.html

Wednesday, September 13, 2017

Painted Harvest Cards - Part 5 of 5

I recently hosted a stamp class that focused on the new Painted Harvest stamp set!  I think this is my favorite and most versatile stamp set in the new Stampin' Up! Holiday Catalog.  This is the fifth & final card of five that we created at the class.


Steps:
1.    Stamp sentiment in Garden Green on Whisper White scrap.  Punch out with Pretty Label punch.
2.    Stamp Sunflower –
       a.    Large background part – Crushed Curry
       b.    Detailed part – Cherry Cobbler
       c.    Center – Chocolate Chip
       d.    Leaves – Garden Green
3.    Use Stampin’ Dimensionals to pop sentiment from card front.
4.    Use snail to adhere card front to Garden Green layer.
5.    Use Stampin’ Dimensionals to pop Garden Green layer from Chocolate Chip layer.
6.    Use snail to adhere Chocolate Chip layer from Crushed Curry card base.
7.    Use snail to adhere Whisper White layer inside of card.

Supplies:
Painted Harvest Stamp Set
Special Celebrations Stamp Set
Crushed Curry cardstock (8 1/2” x 5 1/2” scored at 4 1/4”)
Chocolate Chip cardstock (5 1/4” x 4”)
Garden Green cardstock (3 1/4” x 4 1/2”) 
Whisper White cardstock (5 1/4” x 4”, 4 1/4” x 3”, scrap) 
Crushed Curry, Cherry Cobbler, Chocolate Chip, Garden Green Inks
Pretty Label Punch
Pinewood Planks Dynamic Textured Impressions Embossing Folder
Snail Adhesive, Stampin’ Dimensionals
Whisper White Envelope
 
Inspired by card: https://www.stampinwithcarolread.com/single-post/2017/08/24/Fall-Painted-Harvest

Monday, September 11, 2017

Painted Harvest Cards - Part 4 of 5

I recently hosted a stamp class that focused on the new Painted Harvest stamp set!  I think this is my favorite and most versatile stamp set in the new Stampin' Up! Holiday Catalog.  This is the fourth card of five that we created at the class.


Steps:
1.    Stamp sentiment in Rich Razzleberry on Whisper White oval.
2.    Stamp Sunflower –
       a.    Large background part – Sweet Sugarplum
       b.    Detailed part – Rich Razzleberry
       c.    Center – Smoky Slate
       d.    Dots – Smoky Slate
3.    Use glue dots to adhere Smoky Slate Gingham ribbon to card front.
4.    Use Stampin’ Dimensionals to pop sentiment from card front.
5.    Use snail to adhere card front to Smoky Slate layer, Smoky Slate layer to Sweet Sugarplum card base, and Whisper White layer inside of card.

Supplies:
Painted Harvest Stamp Set
Sweet Sugarplum cardstock (11” x 4 1/4” scored at 5 1/2”)
Smoky Slate cardstock (5 3/8” x 4 1/8”) 
Whisper White cardstock (5 1/4” x 4” x2, scrap) 
Sweet Sugarplum, Rich Razzleberry, Smoky Slate Inks
Stitched Shapes Framelits
Snail Adhesive, Stampin’ Dimensionals, Glue Dots
Whisper White Envelope

Inspired by card: http://www.craftycarolinecreates.com/2017/08/simplystylishstampers-blog-hop.html


Friday, September 8, 2017

Painted Harvest Cards - Part 3 of 5

I recently hosted a stamp class that focused on the new Painted Harvest stamp set!  I think this is my favorite and most versatile stamp set in the new Stampin' Up! Holiday Catalog.  This is the third card of five that we created at the class.


Steps:
1.    Stamp sentiment in Early Espresso on Crumb Cake piece.  Punch right side with Triple Banner Punch.
2.    Stamp Sunflower –
       a.    Large background part – Daffodil Delight
       b.    Detailed part – Crushed Curry
       c.    Center – Early Espresso
       d.    Dots - Early Espresso, Crumb Cake
       e.    Leaves – Garden Green (cut one out of Whisper White scrap with Leaf Punch)
3.    Wrap Linen Thread around card front a couple times and adhere on back with glue dots.
4.    Use glue dots to adhere leaves to sentiment.
5.    Use Stampin’ Dimensionals to pop sentiment from card front.
6.    Use Stampin’ Dimensionals to pop card front from card base.

Supplies: 

Painted Harvest Stamp Set
Beautiful Bouquet Stamp Set
Thick Whisper White cardstock (8 1/2” x 5 1/2” scored at 4 1/4”)
Whisper White cardstock (5 1/4” x 4”, scrap)
Crumb Cake cardstock (1” x 3”)
Daffodil Delight, Crushed Curry, Early Espresso, Crumb Cake, Garden Green Inks
Linen Thread
Leaf Punch
Triple Banner Punch
Glue Dots, Stampin’ Dimensionals
Whisper White Envelope

Inspired by card: Stampin’ Up! 2017 Holiday Catalog

Tuesday, September 5, 2017

Painted Harvest Cards - Part 2 of 5

I recently hosted a stamp class that focused on the new Painted Harvest stamp set!  I think this is my favorite and most versatile stamp set in the new Stampin' Up! Holiday Catalog.  This is the second card of five that we created at the class.


Steps:
1.    Stamp sentiment in Peekaboo Peach on Soft Sky card base.
2.    Stamp Sunflower –
       a.    Large background part – Lemon Lime Twist
       b.    Detailed part – Peekaboo Peach
       c.    Center – Soft Sky
3.    Use snail to adhere sunflower piece to Lemon Lime Twist scalloped circle.
4.    Use snail to adhere DSP piece to Peekaboo Peach piece.
5.    Use Stampin’ Dimensionals to pop Peekaboo Peach piece from card base.
6.    Use Stampin’ Dimensionals to pop Lemon Lime Twist piece from DSP.
7.    Use snail to adhere Whisper White layer inside of card.

Supplies:

Painted Harvest Stamp Set
Soft Sky cardstock (11” x 4 1/4” scored at 5 1/2”)
Peekaboo Peach cardstock (3 1/4” x 3 1/4”) 
Painted Autumn DSP (3” x 3”) 
Lemon Lime Twist cardstock (scrap) 
Whisper White cardstock (5 1/4” x 4”, scrap) 
Lemon Lime Twist, Peekaboo Peach, Soft Sky Inks
Layering Circles Framelits
Snail Adhesive, Stampin’ Dimensionals
Whisper White Envelope

Inspired by card: http://www.craftykylie.com/2017/08/i-am-thankful-for-you-painted-autumn.html

Sunday, September 3, 2017

Painted Harvest Cards - Part 1 of 5

I recently hosted a stamp class that focused on the new Painted Harvest stamp set!  I think this is my favorite and most versatile stamp set in the new Stampin' Up! Holiday Catalog.  Over the next couple weeks I will be sharing the five cards we created at the class.


Steps:
1.    Stamp sentiment in Berry Burst on smaller Whisper White layer.
2.    Stamp Sunflower –
       a.    Detailed part – Lemon Lime Twist
       b.    Dots – Berry Burst
3.    Make bow out of Berry Burst ribbon.
4.    Use glue dots to adhere bow to card front.
5.    Use snail to adhere card front to Lemon Lime Twist piece.
6.    Use Stampin’ Dimensionals to pop Lemon Lime Twist piece from card base.
7.    Use snail to adhere Whisper White layer inside of card.

Supplies:

Painted Harvest Stamp Set
Star of Light Stamp Set
Berry Burst cardstock (11” x 4 1/4” scored at 5 1/2”)
Lemon Lime Twist cardstock (4 7/8” x 3 5/8”) 
Whisper White cardstock (5 1/4” x 4”, 4 3/4” x 3 1/2”) 
Lemon Lime Twist, Berry Burst Inks
5/8” Crinkled Seam Binding Berry Burst Ribbon
Snail Adhesive, Stampin’ Dimensionals, Glue Dots
Whisper White Envelope
 
Inspired by card: http://www.nancyferbshares.com/nancy-ferb-shares-papercr/2017/08/painted-harvest-creates-holiday-wreath.html